By Lauren Heskin
25th Nov 2014
25th Nov 2014
Centrepiece
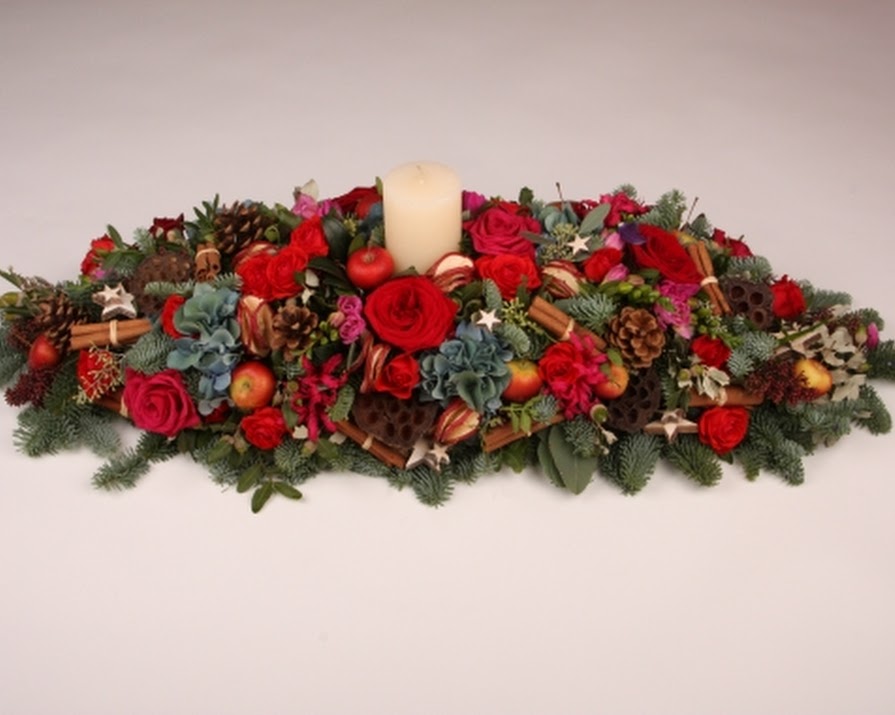
Perfect for the smaller Christmas dinner gang on a long table and an Appassionata bestseller. A teardrop garland with one candle filled with noble pine, winter foliage, roses, hydrangea, fruit & cinnamon. In the world of Christmas dinners, this table centre proves always to be a winner. Also smells divine and will last for ages.
Christmas time is a great time to be a florist. You get to create, decorate and help people make the Christmas they want to have by setting the tone through flowers and gifts. This year we are going for nordic earthiness with a twist of luxury, after all, who doesn’t love a burnish of berry and bling in December.
This table centre can be made up to two weeks before the date of giving or using once stored in a cool place.
How to create a lovely table centre is a bit easier than it sounds, it’s all about the preparation and then you are ready to go. Here are suggested ingredients to use but we are great believers in foraging from your garden and surrounds to create the table centre textures you love yourself. So spot that great ivy clad back wall or find those twigs in the park, pick up fallen cones and conkers from the ground or you might be lucky to find fallen lichened twigs after a storm. Some people will love to have a crazy mix of foliages and twigs in an unruly rounds, whilst others might wish for a fragrant piece filled with bay leaves and rosemary and their own dried hydrangea (best left upside down to dry).
The idea below is based on a classic Christmas table centre with the idea that it can be adapted to suit as a gift or as your own table centre plus it can be placed around the house from dining to coffee table, hall console to windowsill. Thee best thing about them is that you can make them at home in an evening with a tasty glass of red and great music to keep you inspired…

THE GATHERING LIST
- TOOLS: You will need a florist scissors, a double length oasis tray and two blocks of oasis, oasis tape (the thicker kind), heavy weight stub wire, glue gun (if you have one).
- BASE MATERIALS: A nice pillar candle (4×3 inch are great), a branch of noble pine, a mix of foliage including ivy and berried ivy, red and green skimmia plants, eucalyptus or small leaf foliage, a stem of ilex holly or winter berries, hypericum and viburnum berries.
- THE DRESSING MATERIALS: Cinnamon cut into 8cm lengths, pinecones, small apples (kids? apples are great), dried oranges and star anise, bay leaves, mini pieces or bark or small wooden decorations, twiggy bits.
- FLOWERS TO GIVE THE WOW: Deep red velvet grand prix roses, piano roses, dried hydrangea, freesia, spray roses, nerines and lisianthus….
BEST TO PREPARE:
- Soak Oasis Bricks: This is the most important thing to do correctly. Fill your kitchen sink with cold water, drop in your bricks and let them happily soak away whilst you get all else prepped up. Pushing the foam down will only result in large gaps of dry foam inside which then results in a dead flower display before you know it.
- Prepare the Candle: Cut a stick of wood/twig/lollipop stick or similar into four x 7cm lengths.? Use the waterproof oasis tape to bind the four ‘sticks’ to the base to candle so that it will be ready to push into the oasis and keep sturdy.
- Foliage First: Have the foliage all cut into similar lengths before you start. Don’t have it too long or you will have to use lots more foliage to cover the oasis.
- And the Elements: Have them ready and waiting to be placed in. The apples can be wired by piercing through the base and twisting the wire around itself as if creating a stem. Have the glue gun heating too but well away from kids.
AND NOW TO MAKE:
- Remove oasis from water. Place oasis bricks into tray and bind to secure with tape. Fix in candle into oasis at the centre so it sits sturdy.
- Using the pine, create the shape of the teardrop table centre by putting stems into oasis with stem slightly pointing up.? Create a nice shape by working it side by side. If you put the pine in with a downward angle, the piece will look like it is saying hooray and won’t cover the oasis.
- Then use each type of foliage in stages. By continually twisting the table centre around as you fill it with foliage, you will create a luxurious piece – the idea is that you have a finished looking piece even just with foliage, the skimmia will create nice fullness and texture too!? Try to only place each piece once in the oasis as otherwise you will break up the foam by prodding it too much and the table centre will fall apart which will create tears… I would leave putting the ?berries in until you are finishing the piece so that they will last longer.
- Your elements are next up.? Apples can be dotted in where you see fit. The cinnamon and cones and other accessories can be glued in to save lots of wiring time.
KEEPING YOUR PIECES FRESH
-?????? Store your decadent dinner table pieces in a cool room or shed with plastic underneath. Don’t store them outside or your visiting bird friends will have a party with the berries!
-?????? Top up the vase with water every two days to keep the oasis fresh and it is no harm to spray the foliage.
ON THE DAY BEFORE CHRISTMAS
– Add in the blooms
-?????? Cut your flowers the same length as you prepped the foliage. Place in clutches so you create bursts of blooms or fill the table centre evenly by using the larger blooms first and then the fillers. Keep the display even and stylish by turning the piece around each time you place a bloom in.
-?????? Et Voila!? Sit back, admire your work and take the compliments!
By
Ruth Monahan, Creative Director, Appassionata Flowers


