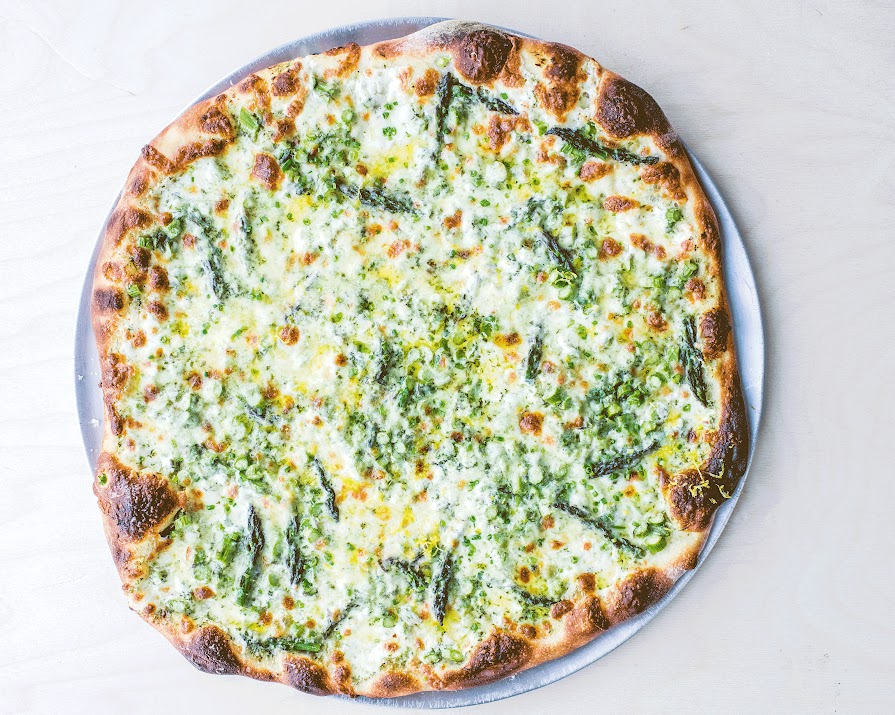
What to eat tonight: Asparagus, spring cream, onion and lemon pizza
By Meg Walker
18th Mar 2021
18th Mar 2021
This pizza is perfect for a weekday dinner and includes the steps to make the perfect base, so you can turn your home into your very own pizzeria.
The first asparagus of the season is always a treat. Make sure you wash it, as it can be a little sandy. You also need to make sure that you get rid of the woodsy, inedible bottoms. The freshest cut stuff that you find at the farmers’ market is always best. I slice the spears into little coins. The thinner, the better.
Asparagus, Spring Cream, Onion & Lemon Pizza
Makes 14-16″ pizza
Ingredients
- 1 ball dough: use your favourite dough or pick some up from a local pizzeria
For the spring cream (makes about 960ml, you will need 165ml for this pizza)
- 1 handful of basil (10-20 leaves)
- 25g chopped fresh fennel fronds
- 25g chopped fresh chives
- zest and juice of 1 lemon
- 1 large clove garlic, pressed or minced
- pinch of red pepper flakes
- 960ml heavy cream
- fine sea salt and freshly ground black pepper to taste
For the toppings
Advertisement
- 85g fresh mozzarella, pinched into small chunks
- 220g shredded low-moisture mozzarella
- 270g chopped fresh asparagus
- fine sea salt
- 3 tbsp grated hard cheese
- extra-virgin olive oil
- 1 lemon wedge
- 2 tbsp chopped fresh chives
Method
1 Preheat the oven and pizza stone to 260ºC or, if possible, 287ºC. To make the pizza, first follow the instructions on prepping and rolling out the dough included in the Make & Bake section (see below).
2 Combine all the ingredients for the Spring Cream in a food processor. Blend until slightly emulsified. It will keep in the refrigerator for about 5 days.
3 Cover the dough with the Spring Cream, then add the mozzarellas. Now I like to add a very liberal amount of asparagus. Season with salt. Bake as described in Make & Bake (see below).
4 Finish with the grated hard cheese, a drizzle of olive oil, a spritz of fresh lemon juice from the wedge, and the chives.
Advertisement
Make & Bake
Our goal is to replicate the brick oven we use at Pizzeria Beddia, which absorbs and radiates heat, for baking in your home. I recommend using a good baking stone. A thick stone will hold heat better and longer. If you don’t already have a stone (or a baking sheet), you can always go to a home supply store and buy a bunch of terra-cotta tiles. They come in all different sizes, so just get enough tiles to cover the rack of your oven. They’re perfectly square so they fit together really well with no gaps – just find ones that fit your oven. Those work – trust me, I’ve tried everything.
1 Place your stone on the lowest shelf of your oven, then turn your oven to its highest temperature. Most ovens go to 260ºC and some to 287ºC. Heat your stone for at least one hour before baking.
2 Now that the oven is good, we can focus on the dough. If you’re taking your dough out of the fridge, give it about 15 minutes or so to warm up a bit so it will be easier to work with. It should have doubled in size in the fridge. If it hasn’t, let it sit at room temperature, covered with a slightly damp towel until it does.
Advertisement
3 Next you can set up your “pizza station”. Take the sauce out of the fridge. Then get your utensils ready: sauce ladle, dough scraper, and pizza cutter. You’ll also need a medium to large bowl with a couple of cups of flour in it. This will act as a dunk tank for your dough and for flouring your workspace. You’ll also want a cup with a few ounces of semolina flour for dusting your pizza peel. Please do not use cornmeal. I find its texture distracting and don’t think it belongs on a pizza.
Rolling out the dough
1 Lightly flour your counter and your hands. There is a lot of moisture in the dough, so you want to keep your counter and hands well-floured at all times, otherwise the dough will get sticky and impossible to handle. Lift the dough from its surface or container. If it doesn’t seem to want to move, you’ll have to use a dough scraper. Flip the dough into the flour bowl so the top side of the dough ball gets dusted first. Flip it once more, making sure that the dough is completely coated. Press the dough down into the flour, then pick it up and place it on the floured countertop.
2 Pressing your fingers firmly into the dough, start by flattening the centre and work your way out toward the edge to make it wider, until it’s about 7 to 9 inches wide. Pushing down on the dough will release some of the gas and actually begin opening up the dough. Be careful not to disturb the outermost lip. This will eventually become your crust.
3 The next step is a bit tricky. Your goal is to take this disc of dough and carefully stretch it to about 14 to 16 inches without tearing it or creating a hole. I pick it up with floured hands and begin to gently stretch it over my fists, letting gravity do most of the work.
4 Once you’ve stretched it enough, put the dough back on the counter, making sure there is a generous dusting of flour underneath. Take a few generous pinches of semolina flour and dust your pizza peel. Make sure it’s coated evenly. Gently lift and transfer your dough to the peel. Make sure both your hands and the peel are well-floured. You are now ready to dress your pie.
Baking the pizza
1 Now it’s time to put the almost-pizza in the oven. With a firm and steady hand, take the peel and insert it into the oven at a slight downward angle, touching the tip of the peel to the back edge of the stone. This may not come easy on your first try, and it will take some practice to gain confidence. Give the peel a short jerk forward so that the dough begins to slide off the peel. Once you have the front end of the dough safely on the stone, gently pull the peel out and close the oven.
Advertisement
2 The hard part is over. It’s time to let the oven do the work. Time your bake. It’s best when your oven has a window and a light for watching the bake. I like to watch.
3 Let it go for 4 minutes. The crust will rise significantly. Then change the oven setting from bake to grill, cooking the pizza from the top down until the crust begins to blister. The residual heat of the stone will continue to cook the bottom.
4 I cook all my pizzas until they’re well done, which could take up to 10 minutes total (sometimes less). Just keep checking so you don’t burn it. Look for the cheese to colour and the crust to turn deep brown. It may blacken in spots, and that’s okay.
5 When the pizza is finished baking, slide your peel underneath it in a quick motion so that the pizza is sitting directly on top of the peel. Take it out of the oven and place it on a cutting board. There it is: a glorious pizza.
Tip: Do not use your peel as a cutting surface. I made that mistake early on and ruined the peel. A cutting board or an aluminium pizza tray is best.

Advertisement
Extracted from Pizza Camp: Recipes from Pizzeria Beddia by Joe Beddia (Abrams, approx €24). Photography – 2017 Randy Harris


